


Introduction
In the previous article, you learned how to backtrack in Git.
Now that you know how to backtrack in Git, you can start branching in Git.
Branching can be helpful for many different reasons, like:
testing out new features in your projects
fixing bugs or other errors in your projects
or any other situations where you don't want to mess with the original code 😂
In this article, I'll teach you how to use branching to your advantage. You'll use Bakery for this, so please cd into that directory now.
NOTE: You might want to be at a computer or laptop (to get the full experience).
git branch
The first thing to learn is how to create and list branches.
To list branches, type git branch into the terminal. It should output only one branch - main - in green and/or with an asterisk next to it.
Now let's add a new branch to that list. Creating a branch is as simple as this:
git branch <branchname>
Once your branch is created, use git checkout <branchname> to switch branches. Try listing the contents and logging the commits - everything should be the same as the main branch!
Mini-Test: Create a new branch in Bakery, then switch to it. You can name it whatever you'd like.
git branch -m
To rename a branch in Git, all you need is:
git branch -m old-name new-name
Renaming branches is helpful for many different situations. I find it to be especially helpful for changing the branch master to main when initializing a new Git project.
Mini-Test: Rename an existing branch, or create a new branch and rename it.
git merge
Another important part of knowing how to branch is knowing how to merge. After all, what good does branching to test or fix things do if you can't merge it with the main project?
You can use git merge <branchname> to merge branches.
NOTE: The branch you call using the above code will be merged with the branch your current branch, so make sure you're on the right branch before merging. Use git checkout <branchname> to switch to the correct branch, if you aren't already on it.
The main con that comes with merging branches is merge conflicts. Though it mostly happens within a teamwork environment, it can also happen with personal projects, so it deserves a mention here.
Merge conflict comes from two different branches having different (uncommitted) changes made to the same file. As I noted earlier, everything between the two branches is the same, up until the point that you make an uncommitted change on both branches. Doing so leads to a conflict of interests, as Git doesn't know which one to keep!
Resolving merge conflicts is actually really simple once you know how to do it. All you have to do is view and change the differences in the marked-up file (automatically marked up for your convenience!)
Mini-Test: Change the text of the files created in Changing the File System on both the main branch and the new branch. Stage and commit the file on both branches, then try to merge.
Oops, there's been a merge conflict (total accident...😉). Perfect time to test your knowledge!
First, open the conflicted file in your preferred text editor. It should be marked up with:
arrows (showing the original version)
equal signs (as a divider...there's no true purpose)
more arrows (showing the conflicting version)
It will look something like this (you may want to open the image in a new tab):
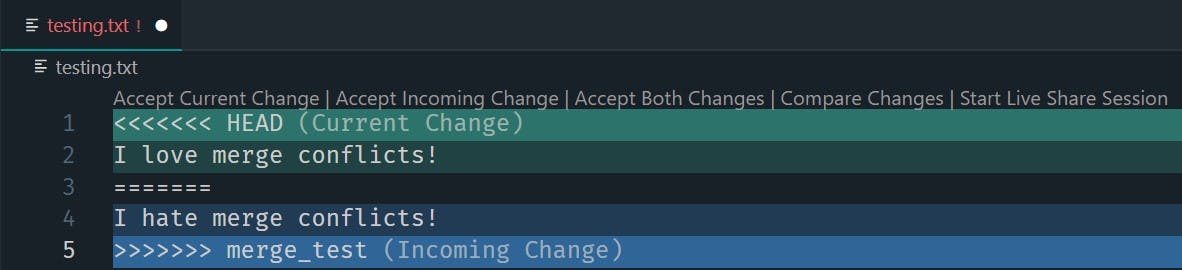
Git, in its own special way, is asking you what version to keep: the current change or the incoming change.
Mini-Test: Decide which one you'd like to keep, then delete the contents as they appear on the opposite branch (as well as all special markings). Try to merge again - it should work!
git branch -d
Deleting branches in Git is very simple - just use the command git branch -d <branchname>.
There's only one thing to remember (besides the command): use a lowercase d for branches that were never merged with main and use an uppercase d for branches that were merged with main.
git push -u origin main
As promised, here's a breakdown of git push -u origin main.
It's like this:
| Command | Function |
| git push | pushes local branches to GitHub |
| -u | adds tracking reference |
| origin | name of our remote connection |
| main | name of our local branch |
Therefore, to push a branch not named main to GitHub, replace main with the new branch name.
Conclusion
In this article, you learned some commands to help you use branches in Git, including:
- git branch (used to list AND create branches)
- git branch -m (used to rename branches)
- git checkout (used to switch branches)
- git merge (used to merge branches)
- git branch -d (used to delete branches)
Great job on completing the eighth part of the series!
This is the 8th part of a 10 part series to teach Windows users about Git Bash. This series includes:
how to install Git Bash
how to change your file system
how to set up Git and GitHub
how to connect Git and GitHub
how to keep up good practices in Git
how to backtrack in Git
how to branch in Git
...and more!!
Stay tuned for more - a new part will come out every Tuesday! 😊